
The scent of warm cookies wafts through the air, drawing everyone to the kitchen like bees to honey. Today, I’m sharing a delightful twist on a classic favorite: Red Velvet Cookie Cups filled with creamy frosting. These treats are not only easy to whip up, making them perfect for spontaneous celebrations, but they also offer the soft, chewy texture and vibrant color that turns heads at any gathering. Whether you’re baking for a special occasion like Valentine’s Day or simply treating yourself, these adorable cookie cups are bound to impress friends and family alike. So, are you ready to add a splash of color to your dessert table?
Why Are Red Velvet Cookie Cups Perfect?
Irresistible combination of flavors: The soft texture of the cookie melds perfectly with the tangy cream cheese frosting, creating a delightful balance that will leave everyone craving more.
Festively vibrant: Their stunning red hue makes them a showstopper for celebrations like Valentine’s Day or birthdays. They’re as pleasing to the eye as they are to the palate!
Effortlessly shareable: These cookie cups are not only fun to make, but they also make serving a breeze—no need for slicing or crumbling.
Versatile topping options: Feel free to mix things up by experimenting with different frostings or toppings, like trying out a Zesty Orange Cookie for a citrus twist!
With so much to love about these Red Velvet Cookie Cups, you’ll be the star of every gathering!
Red Velvet Cookie Ingredients
• Get ready to create something special!
For the Cookie Mix
- Flour – Provides structure to the cookie; substitute with a gluten-free flour blend for a gluten-free option.
- Unsweetened Cocoa – Adds a chocolate flavor; ensure it’s unsweetened for balanced sweetness.
- Kosher Salt – Enhances overall taste; regular table salt is a suitable substitute.
- Baking Soda – Helps the cookie rise; you can use baking powder as a substitute by increasing it to 1 teaspoon.
- Butter – Adds richness and moisture; can be replaced with vegetable oil for a dairy-free version.
- Granulated Sugar – Provides sweetness and texture; substitute with coconut sugar for a lower glycemic option.
- Brown Sugar – Contributes moisture and a caramel-like flavor; can be swapped for white sugar for a lighter taste.
- Egg – Binds the ingredients together; for an eggless version, use 1/4 cup unsweetened applesauce.
- Red Food Coloring – Gives the cookie its signature color; omit for a traditional chocolate cookie or use beet juice for a natural alternative.
- Vanilla Extract – Adds depth to the flavor; use almond extract for a unique twist.
- White Vinegar – Reacts with baking soda for tenderness; substitute with lemon juice if unavailable.
For the Frosting
- Cream Cheese – Adds tanginess to the frosting; vegan cream cheese can be used for a dairy-free option.
- Powdered Sugar – Sweetens the frosting; you can mix in less to reduce sweetness.
- Additional Butter (for frosting) – Provides creaminess; omit or reduce for a lighter frosting.
Step‑by‑Step Instructions for Red Velvet Cookie Cups
Step 1: Preheat the Oven
Begin by preheating your oven to 350°F (175°C). This crucial step ensures that your Red Velvet Cookie Cups bake evenly and develop that soft, chewy texture we all adore. While the oven warms up, gather your mixing bowls and mini muffin tins, so you’re ready to start the mixing process.
Step 2: Prepare the Dry Mix
In a small bowl, whisk together the flour, unsweetened cocoa powder, kosher salt, and baking soda until well combined. This dry mix sets the foundation for your cookies, helping to create that delightful red velvet flavor. Once combined, set the bowl aside, allowing the ingredients to blend harmoniously.
Step 3: Cream the Sugars and Butter
In a large bowl, cream together the softened butter, granulated sugar, and brown sugar until the mixture is smooth and light in color, which should take about 2-3 minutes. This step is crucial for incorporating air into the dough, giving your Red Velvet Cookie Cups the tender texture everyone craves.
Step 4: Add Wet Ingredients
Next, add the egg, red food coloring, vanilla extract, and white vinegar to the butter-sugar mixture. Beat them together until fully combined and smooth, about 1 minute. The red food coloring will create that stunning hue, while the vinegar helps activate the baking soda to achieve the perfect rise.
Step 5: Combine the Dry and Wet Ingredients
Gradually incorporate the dry mixture into the wet ingredients, mixing just until combined. Be careful not to overmix, as this can result in tough cookies. The dough should be thick and vibrant red, ready to be turned into cookie cups that will impress your guests.
Step 6: Prepare the Muffin Tins
Grease two 24-cup mini muffin tins with non-stick spray or a light coating of butter. This is crucial to ensure your Red Velvet Cookie Cups come out easily without sticking. Using a spoon or cookie scoop, fill each muffin cup about 3/4 full with the cookie dough, making sure they’re evenly distributed for uniform baking.
Step 7: Bake the Cookie Cups
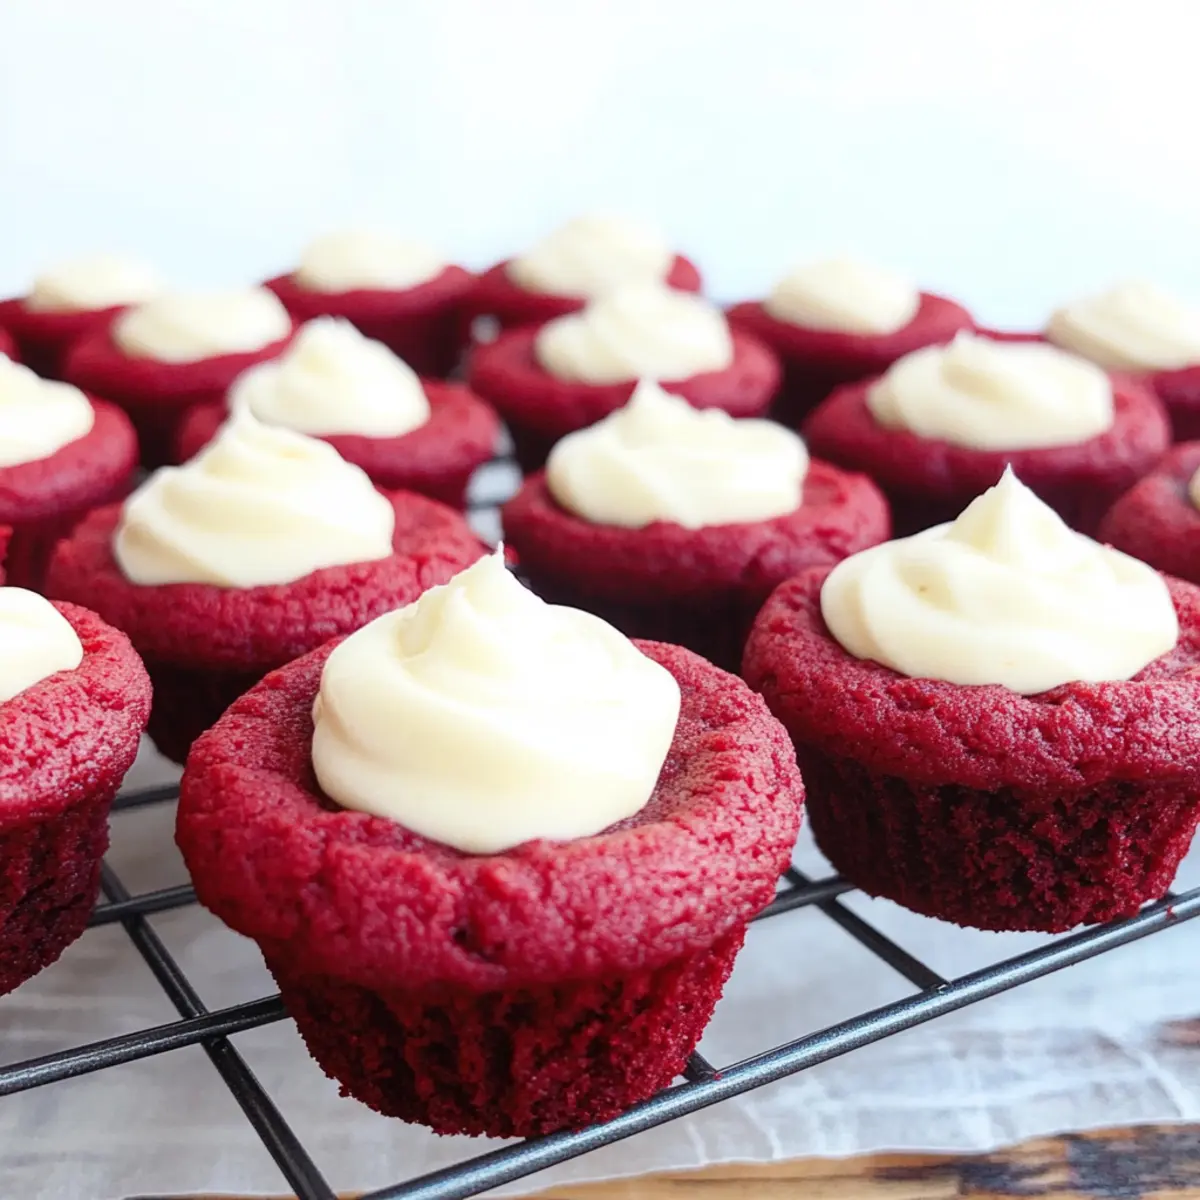
Place the muffin tins in the preheated oven and bake for 13 minutes. When done, the cookies should look set and slightly puffed. Carefully remove the tins from the oven and quickly use a spatula to create an indentation in the center of each cookie cup while they are still warm. This will give them a lovely spot for the creamy frosting.
Step 8: Cool the Cookie Cups
Allow the cookie cups to cool in the tin for about 5 minutes. This resting period lets them firm up and makes transferring easier. After the time is up, gently remove them from the muffin tins and place the cookie cups on a wire rack to cool completely.
Step 9: Prepare the Cream Cheese Frosting
While the cookie cups cool, prepare the frosting by beating together softened cream cheese, additional butter, powdered sugar, and vanilla extract until smooth and creamy, usually taking about 2-3 minutes. The frosting should be light in texture and easy to pipe, ready to crown your delightful Red Velvet Cookie Cups.
Step 10: Frost the Cookie Cups
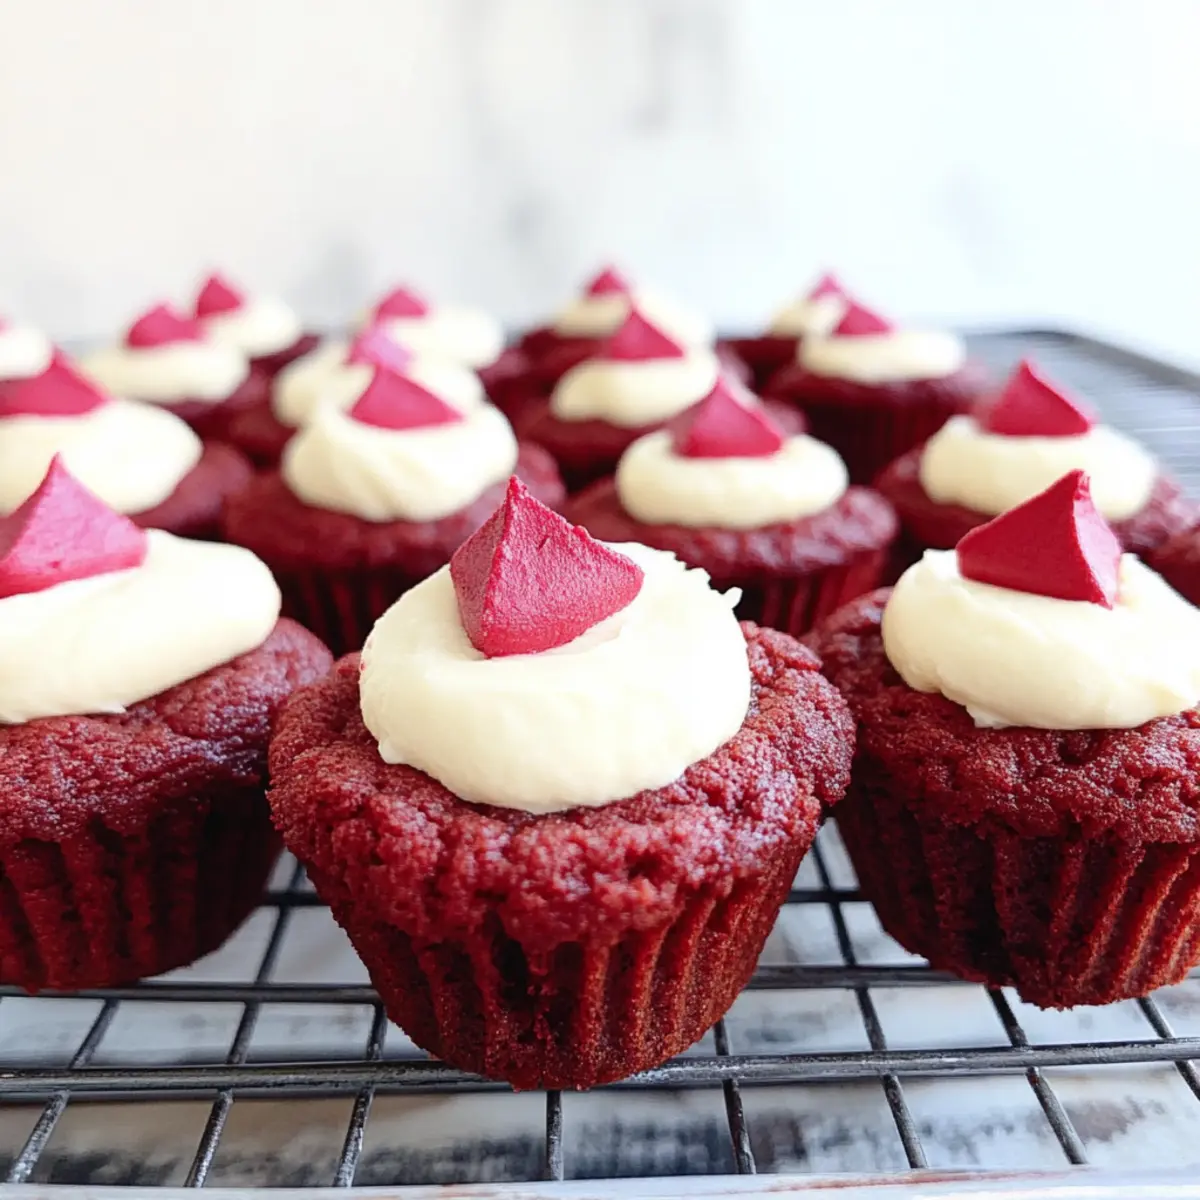
Once the cookie cups are completely cool, generously pipe the cream cheese frosting into the center of each cup. This adds that essential tangy sweetness that pairs beautifully with the rich red velvet flavor, creating an irresistible treat perfect for any celebration.

Make Ahead Options
These Red Velvet Cookie Cups are perfect for busy home cooks looking to save time without sacrificing taste! You can prepare the cookie dough up to 24 hours in advance; simply mix all the wet and dry ingredients, cover the bowl tightly, and refrigerate. The cookie cups can also be baked and stored in an airtight container for up to 3 days. To maintain their delightful soft texture, let them cool completely before sealing. When you’re ready to serve, just pipe the cream cheese frosting into the cooled cookie cups, and you’ll have an impressive dessert ready in no time, delivering that fabulous homemade flavor everyone loves!
Red Velvet Cookie Variations
Feel free to unleash your creativity and customize these cookie cups to suit your taste!
-
Gluten-Free: Use a gluten-free flour blend instead of regular flour for a delightful gluten-free treat. Your loved ones won’t even notice the difference in taste!
-
Vegan: Substitute the butter for coconut oil and the egg for 1/4 cup unsweetened applesauce; enjoy a cruelty-free version of these luscious cookie cups.
-
Citrus Zest: Add lemon or orange zest to the cream cheese frosting for a bright, refreshing twist that balances the sweetness beautifully.
-
Decadent Chocolate: Replace some of the red food coloring with dark chocolate cocoa powder for a deeper chocolate flavor without losing the captivating red hue.
-
Nutty Crunch: Top with chopped walnuts or pecans for a delightful crunch that adds texture to the soft cookie cups—perfect for nut lovers!
-
Spicy Kick: Incorporate a pinch of cinnamon or cayenne pepper into the cookie batter for a warm, unexpected heat that pairs perfectly with the cream cheese frosting.
-
Mini Celebration: Instead of muffin tins, use a baking sheet to create a delicious cookie sheet version. Slice them into bars for easy serving at parties!
With these delightful variations, you can elevate your Red Velvet Cookie Cups to new heights. And remember, if you’re seeking other festive treats, consider whipping up some Marshmallow Swirl Cookies or a batch of Chocolate Peppermint Cookies! Happy baking!
Storage Tips for Red Velvet Cookie Cups
Room Temperature: Store the cookie cups at room temperature for up to 2 days in an airtight container. This keeps them soft and chewy.
Fridge: If you need to store them longer, place the cookie cups in the refrigerator for up to one week. Keep them in an airtight container to prevent drying out.
Freezer: For longer storage, freeze the unfrosted cookie cups in an airtight container for up to 3 months. Thaw at room temperature and then frost before serving.
Reheating: Gently warm cookie cups in the microwave for about 10-15 seconds if stored in the fridge; this will restore some softness before you enjoy them.
What to Serve with Red Velvet Cookie Cups
These delightful treats are the perfect centerpiece for any gathering, inviting sweet conversations and joyful celebrations.
- Fresh Berries: Bright, tart berries like raspberries or strawberries contrast beautifully with the sweetness of the cookie cups, adding a refreshing element.
- Chocolate Milkshake: A rich, creamy milkshake pairs wonderfully, harmonizing with the chocolate flavors while offering a luscious sip between bites.
- Sparkling Water with Citrus: The effervescence and zesty notes uplift the rich cookie cups, enhancing their flavor without being overly sweet.
- Vanilla Ice Cream: A scoop of creamy vanilla ice cream serves as the perfect cool complement, making every bite even more indulgent.
- Creamy Coffee: A latte or cappuccino brings warmth and a slight bitterness that balances the sweetness of the Red Velvet Cookie Cups, making for a cozy pairing.
- Mini Cheesecakes: Offer these as another sweet option, creating a delightful dessert platter that encourages variety and indulging in delicious flavors.
- Chocolate-Covered Strawberries: These treats add a romantic touch that enhances the festive atmosphere, perfect for special occasions like Valentine’s Day.
- Whipped Cream Topped Hot Cocoa: Perfect for a cozy night in, the sweet, warm drink pairs so well with the soft texture of your cookie cups.
- Caramel Sauce: Drizzle this on top of the cookie cups for an added layer of flavor and a rich, gooey delight that will excite the senses.
- Nutty Snack Mix: A crunchy nut mix offers contrast in texture while balancing the sweetness, making it a perfect side to munch on alongside the cookie cups.
Expert Tips for Red Velvet Cookie Cups
-
Room Temperature Ingredients: Ensure all ingredients are at room temperature for the best mixing and baking results. This helps create a smooth, cohesive dough that bakes evenly.
-
Indentation Timing: When creating the indentation, do it quickly while the cookie cups are still warm. Waiting too long can result in cookies that are too firm to hold the frosting.
-
Don’t Overmix: When combining the wet and dry ingredients, mix just until combined. Overmixing can lead to tough Red Velvet Cookie Cups.
-
Balancing Sweetness: Adjust the amount of powdered sugar in your cream cheese frosting to suit your taste. Start with less sugar, especially if you prefer a slightly tangy bite.
-
Experiment with Flavors: Feel free to add a splash of different extracts, like almond or lemon, to your cream cheese frosting for a delightful twist!
Red Velvet Cookie Cups Recipe FAQs
How do I choose the best ingredients for Red Velvet Cookie Cups?
Absolutely! When selecting your ingredients, look for fresh flour and unsweetened cocoa powder for the best flavor. Ensure your butter is at room temperature to achieve a creamy texture when creaming with sugars. For the vibrancy in color, choose a good quality red food coloring; however, you can use natural options like beet juice for a healthier alternative.
How should I store Red Velvet Cookie Cups?
Very! Store your Red Velvet Cookie Cups in an airtight container at room temperature for up to 2 days. If you want to keep them longer, you can refrigerate them for up to one week. Just make sure to allow them to come to room temperature before serving for that soft, chewy goodness!
Can I freeze Red Velvet Cookie Cups?
Absolutely! To freeze the unfrosted cookie cups, place them in an airtight container or freezer bag, separating layers with parchment paper to avoid sticking. They’ll keep well frozen for up to 3 months. When you’re ready to enjoy, simply thaw them at room temperature and then frost with cream cheese frosting before serving.
What should I do if my cookie cups don’t rise properly?
If your Red Velvet Cookie Cups don’t rise as expected, there could be a few reasons. First, check that your baking soda is fresh and active; old baking soda can lead to flat cookies. Also, ensure you’ve mixed your wet and dry ingredients just until combined—overmixing can affect the cookies’ texture. For the best results, always use room temperature ingredients to help them blend seamlessly.
Are Red Velvet Cookie Cups suitable for those with dietary restrictions?
Very! To cater to different dietary needs, you can easily make these Red Velvet Cookie Cups gluten-free by substituting regular flour with a trusted gluten-free blend. For a dairy-free option, swap butter for vegetable oil and cream cheese for vegan cream cheese. Plus, for an eggless version, use unsweetened applesauce, and they will still taste delicious!
What can I do if I don’t have red food coloring?
No worries! If you find yourself without red food coloring, you can either omit it for a chocolate cookie experience or choose to use natural alternatives like beet juice or pomegranate juice. Just keep in mind that the final color will vary, but it’ll still be equally delectable!

Irresistible Red Velvet Cookie Cups with Creamy Frosting
Ingredients
Equipment
Method
- Preheat your oven to 350°F (175°C).
- In a small bowl, whisk together flour, unsweetened cocoa powder, kosher salt, and baking soda.
- In a large bowl, cream together softened butter, granulated sugar, and brown sugar until smooth.
- Add the egg, red food coloring, vanilla extract, and white vinegar to the butter-sugar mixture. Beat until combined.
- Gradually incorporate dry mixture into wet ingredients, mixing just until combined.
- Grease two 24-cup mini muffin tins. Fill each muffin cup about 3/4 full with cookie dough.
- Bake for 13 minutes. Remove from oven and create an indentation in the center of each cookie cup.
- Allow the cookie cups to cool in the tin for about 5 minutes.
- Prepare the frosting by beating together cream cheese, additional butter, powdered sugar, and vanilla extract.
- Pipe the cream cheese frosting into the center of each cooled cookie cup.
Leave a Reply