
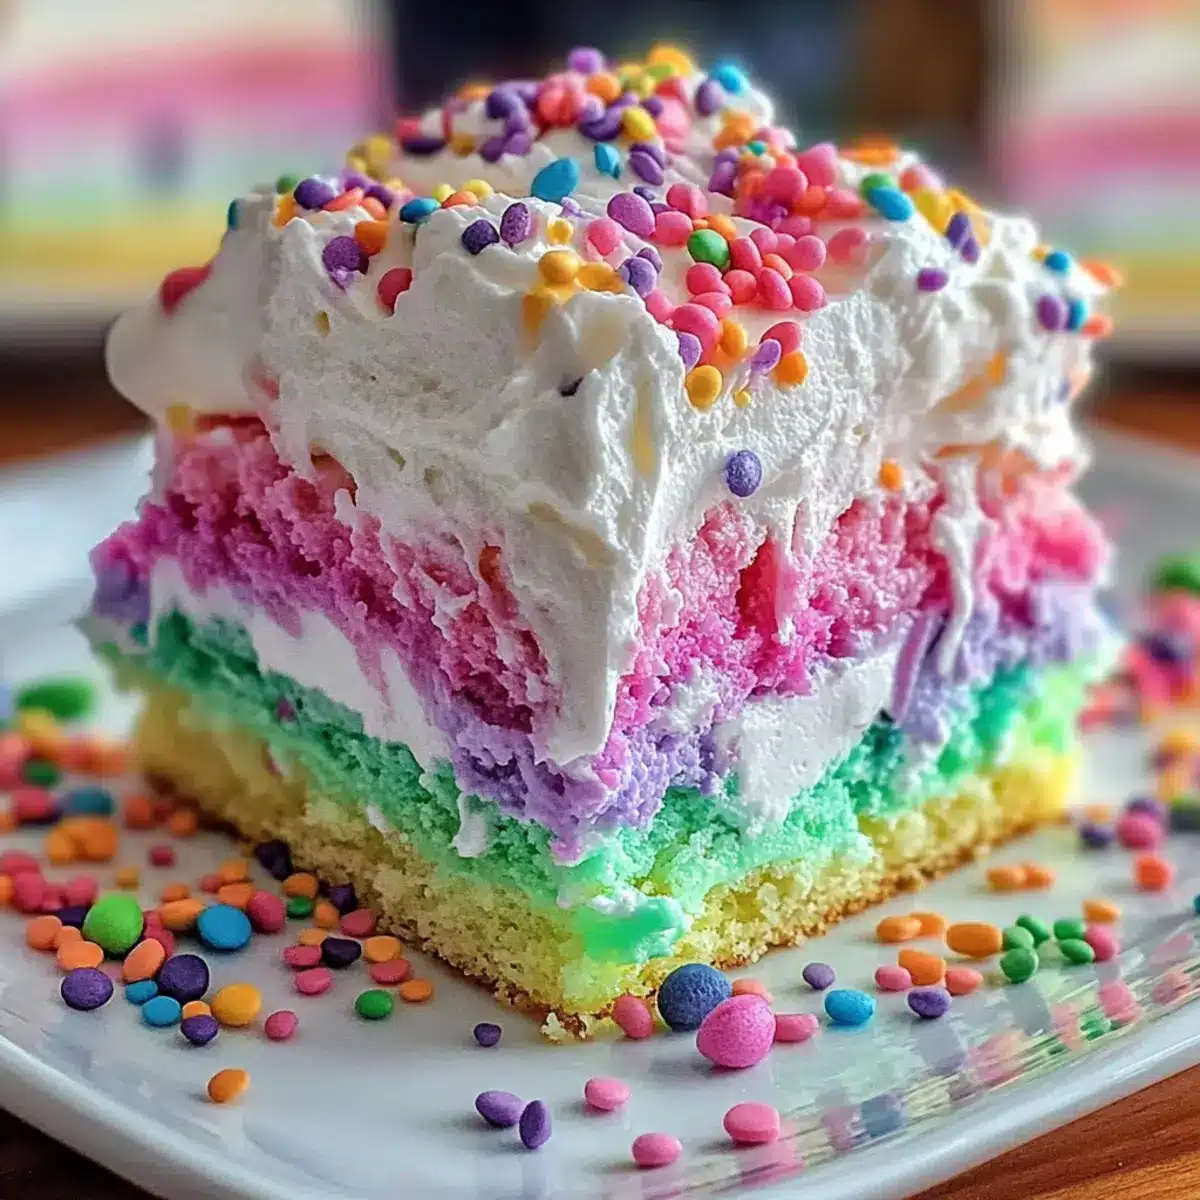
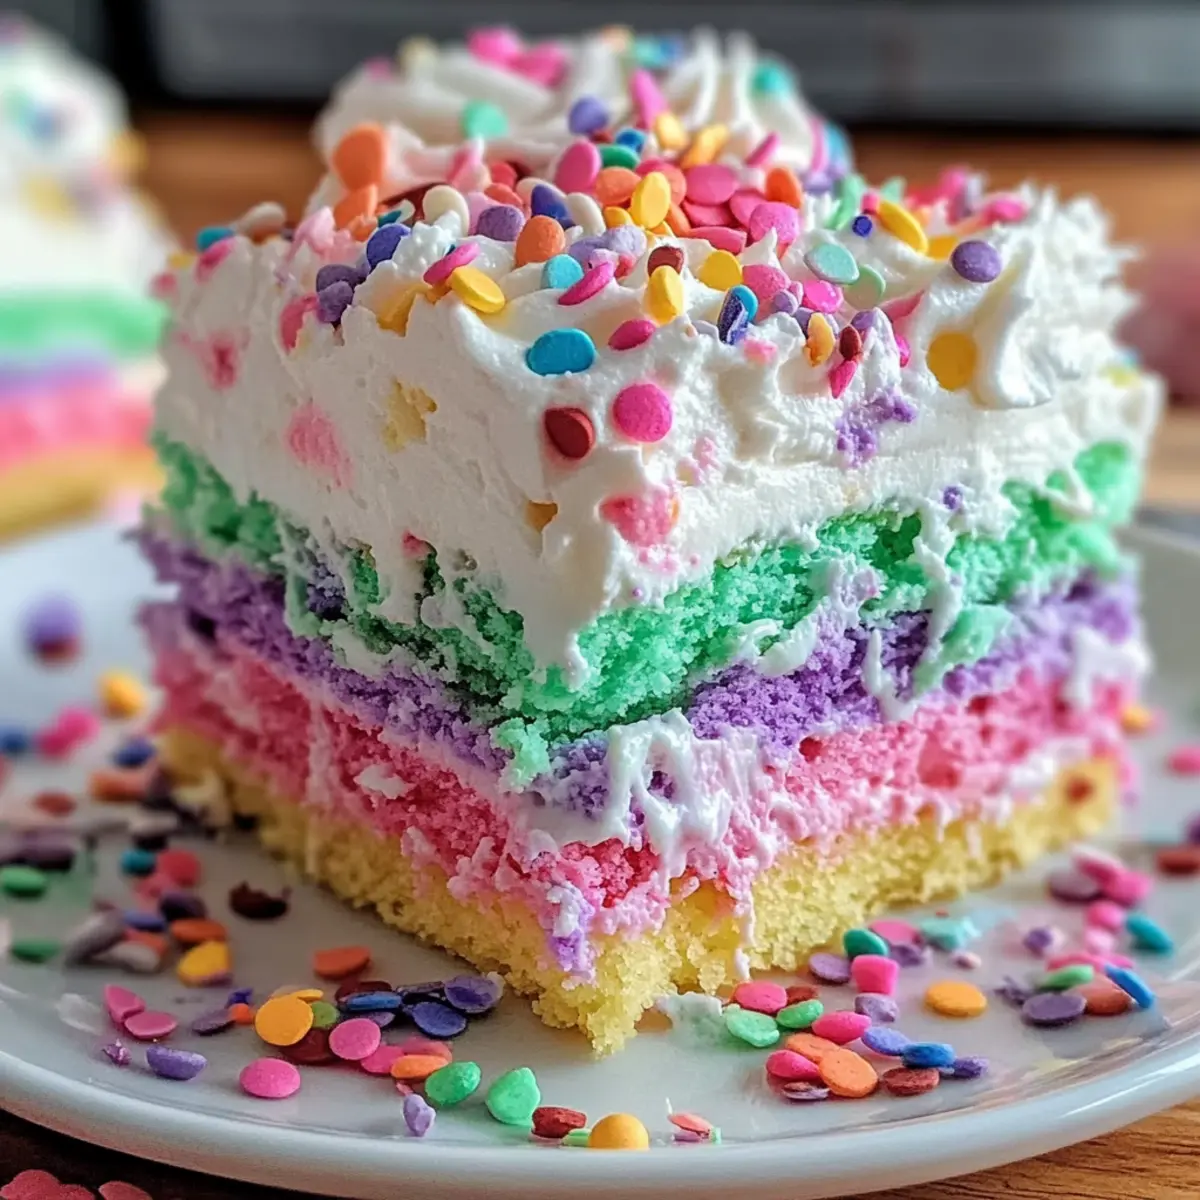
As the blooms of spring burst forth, what better way to celebrate than with a vibrant Easter Poke Cake? This delightful dessert combines colorful pastel swirls and a luscious vanilla pudding filling, all topped off with fluffy Cool Whip, making it a stunning centerpiece for any gathering. It’s not only an easy recipe, perfect for novice bakers, but also a sure crowd-pleaser that will have everyone asking for seconds. Whether you’re hosting an Easter brunch or heading to a potluck, this festive cake promises to bring smiles to the table while putting homemade goodness at the forefront. Curious about how to create this eye-catching treat and put your own spin on it? Let’s dive in!
Why is Easter Poke Cake a must-try?
Vibrant Colors: The pastel hues make this cake a beautiful centerpiece that captures the essence of spring celebrations.
Easy to Make: With simple steps, even novice bakers can whip up this delightful dessert without breaking a sweat.
Customizable Flavors: Use different pudding flavors like lemon or pistachio for a unique twist that’s sure to impress!
Crowd-Pleasing Treat: It’s a hit at every gathering, from Easter brunch to potlucks, leaving guests raving and asking for the recipe.
Make Ahead Option: Easily prepare it in advance, allowing all the flavors to meld together for the best taste when it’s time to serve.
Excited to get baking? This colorful Easter Poke Cake can be the highlight of your feast, just like the delightful Fried Strawberry Cheesecake or rich Butter Pecan Cake!
Easter Poke Cake Ingredients
For the Cake
• Boxed White Cake Mix – This is the foundation of your delicious Easter Poke Cake; opt for a high-quality brand for the best results.
• Eggs – Essential for binding the cake; you can replace them with unsweetened applesauce if you’re seeking a lighter option.
• Oil – Provides moisture and helps the cake to remain soft; feel free to use vegetable or canola oil.
• Water – Needed to prepare the cake mix; stick to the instructions on the box.
For the Pudding Filling
• Instant Vanilla Pudding – This thick, creamy layer enhances the cake’s moistness; try swapping it for lemon or pistachio pudding for a twist.
• Cold Milk – Necessary for whipping up the pudding; you can also use almond or oat milk for a dairy-free version.
For the Topping
• Cool Whip – A fluffy topping that adds a light finish to your cake; consider making your homemade whipped cream for a fresher taste.
• Gel Food Coloring – Helps create those delightful pastel colors; choose shades that reflect the beautiful springtime palette.
• Sprinkles or Other Decorations – Optional for an extra festive touch; think seasonal candies or fresh fruit to elevate the presentation.
Now that you have all your ingredients ready, you’re one step closer to crafting this stunning Easter Poke Cake! Let’s get started on turning those elements into a family-favorite dessert.
Step‑by‑Step Instructions for Easter Poke Cake
Step 1: Preheat Your Oven
Begin by preheating your oven to 350°F (175°C). Grease or line a 9×13-inch baking dish with parchment paper to prevent sticking. An even layer of grease will help your cake easily release after baking. This is the first crucial step in ensuring your Easter Poke Cake bakes perfectly.
Step 2: Prepare the Cake Batter
Next, prepare the boxed white cake mix according to the package instructions, typically involving mixing eggs, oil, and water. Use a large mixing bowl and an electric mixer for smooth consistency. Once you have a well-blended batter, divide it evenly into 3-4 separate bowls, preparing for a colorful layer of fun.
Step 3: Add the Colors
In each bowl of cake batter, add a few drops of gel food coloring to create your desired pastel shades. Mix gently to avoid overmixing; you want to keep the cake light and airy. Each bowl should reflect a cheerful spring color to bring your Easter Poke Cake to life.
Step 4: Assemble the Batters
Now, with a spoon, layer the colored batters into the greased baking dish, alternating colors for a vibrant pattern. Once all the batter is added, use a butter knife to gently swirl the different colors together for a marbled effect. This technique creates a visually appealing design that will impress your guests once baked.
Step 5: Bake the Cake
Place the cake in the preheated oven and bake according to package directions, about 28-32 minutes. To check for doneness, insert a toothpick into the center of the cake; it should come out clean or with a few moist crumbs. Keep an eye on the time to ensure your Easter Poke Cake doesn’t overbake.
Step 6: Cool and Poke
Once baked, remove the cake from the oven and let it cool for 15-20 minutes. After cooling slightly, use a wooden spoon handle to poke holes about 1-inch apart across the entire surface of the cake. These holes will allow the delicious pudding filling to seep into the cake, enhancing its flavor.
Step 7: Prepare the Pudding Filling
In a separate mixing bowl, whisk together the instant vanilla pudding mix and cold milk until thickened, according to package instructions. Work quickly to prevent thickening too much; you want just the right texture to pour over the cake. The creamy pudding adds a delightful moisture to your Easter Poke Cake.
Step 8: Pour the Pudding Over the Cake
Take the prepared pudding and pour it over the cooled cake, ensuring it seeps into all the holes you created. Spread it evenly with a spatula for full coverage. This step is essential for making your cake moist and flavorful, turning the Easter Poke Cake into a irresistible centerpiece.
Step 9: Refrigerate to Set
Cover the dish with plastic wrap or aluminum foil and refrigerate the cake for at least 2 hours, or preferably overnight. This chilling time allows the pudding to set properly and enhances the overall flavor as the cake absorbs the filling. Your patience will truly pay off when you slice into it!
Step 10: Add the Topping
Once chilled, spread the Cool Whip over the top of the cake for a fluffy, light finish. Use a spatula to create swirls for visual appeal. Feel free to decorate the top with sprinkles or seasonal fruit to give your Easter Poke Cake an extra festive touch before serving.
Step 11: Serve and Enjoy
Keep the cake chilled until ready to serve. When it’s time, slice into squares and enjoy the delightful layers of cake and pudding. This Easter Poke Cake is sure to bring joy and sweetness to any gathering, making it a perfect dessert for your spring celebrations.

What to Serve with Easter Poke Cake
Elevate your Easter celebration by pairing this vibrant dessert with complementary sides that enhance the joyful flavors of spring.
- Fresh Fruit Salad: Brighten your table with a colorful mix of seasonal fruits like strawberries, blueberries, and kiwi. Their natural sweetness balances the rich pudding layers perfectly.
- Creamy Vanilla Ice Cream: A scoop of vanilla ice cream brings a delightful contrast to the cool, layered cake, adding a luscious creaminess that everyone loves.
- Lightly Sweetened Whipped Cream: Enhance each slice with a dollop of homemade whipped cream, adding an airy, fluffy texture that pairs beautifully with the moist cake.
- Zesty Lemonade: Serve chilled lemonade with a hint of mint; its refreshing and tangy flavor complements the sweetness of the cake for a delightful sip in every bite.
- Cheesecake Bites: Offer mini cheesecake bites on the side for a little extra indulgence. Their dense, creamy texture beautifully contrasts with the lightness of the poke cake.
- Chocolate-Covered Strawberries: These treats add a touch of sophistication and decadence while providing a lovely balance to the colorful, fruity notes of the cake.
- Nutty Snack Mix: A bowl of lightly salted nut mix will add crunch and savoriness, creating a delightful texture contrast alongside the sweet dessert.
- Mint-Infused Iced Tea: Refresh guests with iced tea infused with fresh mint. Its cooling properties and subtle sweetness are the perfect palate cleanser after a slice of cake.
- Carrot Cake Muffins: To keep with the spring theme, serve carrot cake muffins; their moistness complements the poke cake while offering a different flavor profile.
- Warm Cinnamon Rolls: For a luxurious brunch addition, warm cinnamon rolls bring a beloved classic touch, making for a comforting pairing that’ll warm everyone’s heart.
Make Ahead Options
These Easter Poke Cake tips are perfect for busy home cooks looking to save time while still serving an impressive dessert! You can prepare the cake layers up to 24 hours in advance by baking and cooling them, then poking holes and completing steps 6 and 7. Simply cover the cake tightly with plastic wrap and refrigerate it. The pudding filling can also be made ahead and chilled overnight to allow flavors to meld. When ready to serve, finish with the Cool Whip topping right before guests arrive for the best texture. This way, your Easter Poke Cake will be just as delicious and visually stunning without the last-minute rush!
Storage Tips for Easter Poke Cake
- Fridge: Store any leftover Easter Poke Cake in an airtight container in the refrigerator to maintain freshness; best enjoyed within 3-4 days.
- Freezer: If you want to freeze it, wrap individual slices in plastic wrap, then place them in a sealed freezer bag; it can last up to 2 months.
- Thawing: To enjoy frozen slices, transfer them to the fridge to thaw overnight; serve chilled for the best flavor and texture.
- Reheating: If preferred warm, microwave slices briefly for 10-15 seconds, ensuring not to overheat, as it’s best served cool with creamy layers intact.
Expert Tips for Easter Poke Cake
-
Colorful Swirls: Avoid overmixing the cake batter with food coloring; gently fold to keep that light texture and achieve beautiful pastel swirls.
-
Quick Pudding Prep: Work swiftly when whisking the pudding, as it thickens quickly. Prepare it right after baking for a seamless process.
-
Add Freshness: Consider layering fresh fruit, like strawberries or blueberries, before the Cool Whip for a delightful burst of flavor in your Easter Poke Cake.
-
Chill Time Matters: This cake is best served chilled. If you can, let it refrigerate overnight to allow the flavors to meld beautifully.
-
Watch the Bake Time: Use a toothpick to check doneness and avoid overbaking, which can lead to a dry cake; a few moist crumbs are ideal.
Easter Poke Cake Variations & Substitutions
Feel free to unleash your creativity and customize this delightful Easter Poke Cake to suit your tastes and preferences!
-
Dairy-Free: Use almond or oat milk in place of regular milk and opt for Dairy-Free Cool Whip to keep it light yet creamy.
-
Gluten-Free: Substitute the boxed white cake mix with a gluten-free equivalent to enjoy this festive treat without the gluten.
-
Nutty Twist: Replace vanilla pudding with pistachio pudding for a unique flavor explosion that’s both creamy and crunchy.
-
Fruit-Infused: Blend in fresh fruit puree with the pudding for an extra layer of flavor. Think strawberries or raspberries that can make each bite a pleasant fruity surprise!
-
Chocolate Lovers: For a rich variation, use chocolate pudding instead of vanilla; sprinkle chocolate shavings atop the Cool Whip for that extra indulgence.
-
Zesty Lemon: Swap vanilla pudding for lemon pudding to add a bright and zesty twist that’s perfect for spring gatherings.
-
Tropical Vibes: Mix in crushed pineapple with the pudding for a tropical flair that’s refreshing and unexpected!
-
Hot & Cold: For a fun twist, add a pinch of cayenne pepper to the pudding mixture for a subtle kick that surprises!
No matter how you decide to tweak this cake, it’s destined to be a showstopper. And if you want to explore more festive ideas, check out my delectable Hot Chocolate Cupcakes and try making a classic Christmas Fruit Cake with Brandy next time you’re in the baking mood!

Easter Poke Cake Recipe FAQs
How do I select the right ingredients for my Easter Poke Cake?
Absolutely! For a delightful Easter Poke Cake, choose a high-quality boxed white cake mix, which serves as the foundation of your dessert. When selecting eggs, use fresh ones that are not past their expiration date; they should feel heavy and have no cracks. For food coloring, opt for gel rather than liquid, as it provides a brighter, more vibrant color without altering the batter’s consistency.
How should I store leftovers of the Easter Poke Cake?
Very! Store any leftover cake in an airtight container in the refrigerator. This way, it will maintain its freshness and taste. It’s best enjoyed within 3-4 days. If you have a lot of cake left, you might slice it up and store individual pieces, making it easier to grab whenever you have a sweet craving!
Can I freeze my Easter Poke Cake?
Absolutely! To freeze your Easter Poke Cake, wrap individual slices tightly in plastic wrap, then place them in a sealed freezer bag. This method preserves their moist texture and flavors. The cake can last up to 2 months in the freezer. When you’re ready to enjoy it, simply transfer the slices to the fridge to thaw overnight. For the best experience, enjoy it chilled.
What should I do if my cake is dry or dense?
Oh no! If your Easter Poke Cake turns out dry, it might be due to overbaking it. Use a toothpick to check doneness a few minutes before the recommended time; you want it to come out with a few moist crumbs, not dry. Additionally, ensure you properly measured your ingredients and didn’t skip any key liquids. To revive dry cake, consider serving it with a drizzle of milk or a dollop of vanilla ice cream.
Are there any dietary considerations I should keep in mind?
Very! For those with dietary restrictions, you can easily swap regular ingredients for alternatives. Use non-dairy milk for a lactose-free version, and instead of Cool Whip, make homemade whipped cream from coconut cream or a dairy-free alternative. If you’re watching sugar intake, consider using sugar-free pudding and reduced-sugar cake mix without sacrificing too much flavor. Make sure to monitor any allergies related to ingredients like eggs or specific food colorings.
Delicious Easter Poke Cake: A Festive Springtime Treat
Ingredients
Equipment
Method
- Preheat your oven to 350°F (175°C). Grease or line a 9x13-inch baking dish with parchment paper.
- Prepare the boxed white cake mix according to the package instructions.
- Divide the batter evenly into 3-4 bowls and add gel food coloring to each bowl.
- Layer the colored batters into the greased dish, alternate colors, and gently swirl together.
- Bake in the preheated oven for about 28-32 minutes, checking for doneness with a toothpick.
- Let the cake cool for 15-20 minutes and poke holes across the surface with a wooden spoon handle.
- Whisk together the instant pudding mix and cold milk until thickened.
- Pour the pudding over the cooled cake, ensuring it seeps into the holes.
- Cover and refrigerate for at least 2 hours, preferably overnight.
- Spread Cool Whip over the top and decorate with sprinkles or fruit if desired.
- Serve chilled, slice into squares, and enjoy!
Leave a Reply